UIKit, MVC, and Delegates
Michael Lin
Table of Contents
Swift
Enumerations
An enumeration, or enum, defines a finite set of values and allows you to work with them in a type-safe way. An enum is declared with the enum keyword.
enum Direction {
    case east, south, west, north
}

var currDirection: Direction = Direction.north
In most cases, the type of an enum can be inferred, allowing us to use the dot syntax we saw earlier.
currDirection = .south
To check the case of an enum, we can use a switch statement
switch currDirection {
case .east:
    print("Memorial Stadium")
case .south:
    print("Sproul Hall")
case .west:
    print("Valley Life Science")
case .north:
    print("Soda Hall")
}
alternatively, we can also use an if-case statement
if case .north = currDirection {
    print("We are heading north")
}
The if-case statement is similar to the if-let statement we saw in lesson 1. In addition, both of them can be combined with each other or with other boolean predicates using ,.
Protocols
A protocol defines a blueprint of methods, properties, and other requirements for a particular task or functionality. Classes, structures, and enums can conform to a protocol by providing an implementation to the requirements. A protocol is defined with the keyword protocol.
protocol CalIdentifiable {
    var calid: String { get set }

    func writeCode(_ ha: Bool) -> String
}
In the above example, we defined the protocol CalIdentifiable. We say that in order for an entity to be “CalIdentifiable”, it must have a variable named CalID, and it must also have a method writeCode, which takes in a Bool and returns a String. Notice the method signature and return type has to exactly match. The {get set} simply means that the variable must be both readable and writable. So when we are implementing our Student class, we can make it conforms to the CalIdentifiable protocol by (1) declaring the conformance, and (2) implement the requirements.
class CSStudent: CalIdentifiable {
    var CalID: String = "602214076"

    func writeCode(_ ha: Bool) -> String {
        return "echo \"Hello World\""
    }
}
This example might seem a bit trivial. However, the real power of protocols is when we want to define a standard across multiple types.
class DeNero: CalIdentifiable {
    var CalID: String = "831446261"

    func writeCode(_ ha: Bool) -> String {
        return "diff(mystery, diff(mystery, mystery))"
    }
}
Then imagine that in CalCentral, we want to have a list that stores all the users, which are either Student or DeNero. Without protocol, they are completely unrelated types. But with the CalIdentifiable conformance, we can unify the two types and store it like this:
class CalCentral {
    var users: [CalIdentifiable] = []
}
Closures
A closure is an anonymous function that can be passed around and evoked in your code. It is similar to how lambda expression works in Python, only more powerful. It is defined with a set of curly brackets { }
{ print("This is a closure") }
Closures can be called just like any normal function with parentheses (). Recall that in project 1, we declared our UI components with a closure, and called it in place.
let welcomeLabel: UILabel = {
    let label = UILabel()
    /* Customization */
    return label
}()
A closure can have one or more parameters, defined at the beginning of the closure, and separated from the body using a keyword in
{ (foo: String, bar: Int) in
    print("foo: \(foo), bar: \(bar)")
}
A closure can be assigned as a variable, whose type will need to match the parameter plus the return type of the assigned closure.
let intToString: (Int)->String = { (number: Int) in
    return String(number)
}

myClosure(271828182)
Since closures are usually assigned to places with defined contextual type such as a functional parameter, you will often see closures defined only with the positional arguments
let intToString: (Int)->String = { number in
    return String(number)
}
Here number is assumed to have an Int type.
If the actual type of the closure does not match the contextual type, whether due to incorrect arguments or return type, or the number of positional arguments, Xcode will throw a compile-time error.
let intToString: (Int)->String = { // Error
    return String(number)
}

let intToString: (Int)->String = { (number: Float) in // Error
    return String(number)
}

let intToString: (Int)->String = { number, something in // Error
    return String(number)
}
To make closures both powerful and lightweight, Swift provides several syntax optimization for simple closures:
If the body of a closure only has a single statement, the return keyword can be omitted
let intToString: (Int)->String = { number in
    String(number)
}
We can also refer to those positional arguments by its order - $0, $1, $2, and so on.
let intToString: (Int)->String = { number in
    String($0)
}
In which case, we don’t even need to write out the argument list and the in keyword.
let intToString: (Int)->String = { String($0) }
Collection View
So far we’ve seen quite a few basic components from UIKit: UILabel for text, UIButton for user interaction, UIImageView image display, and UIStackView (from demo 1) for quick stack based layout.
 While there’re many more built-in components like those shown in the picture above, for now we will shift our focus towards the compositional side the UI, meaning how to combine these basic components into a full user experience.
For iOS, one of the most powerful tools in our repertoire is the UICollectionView. It is a view that manages and presents an ordered, structured collection of data items. Collection views have come a long way since it was first introduced in iOS 6. In WWDC19, it received a major update that makes it extremely versatile.
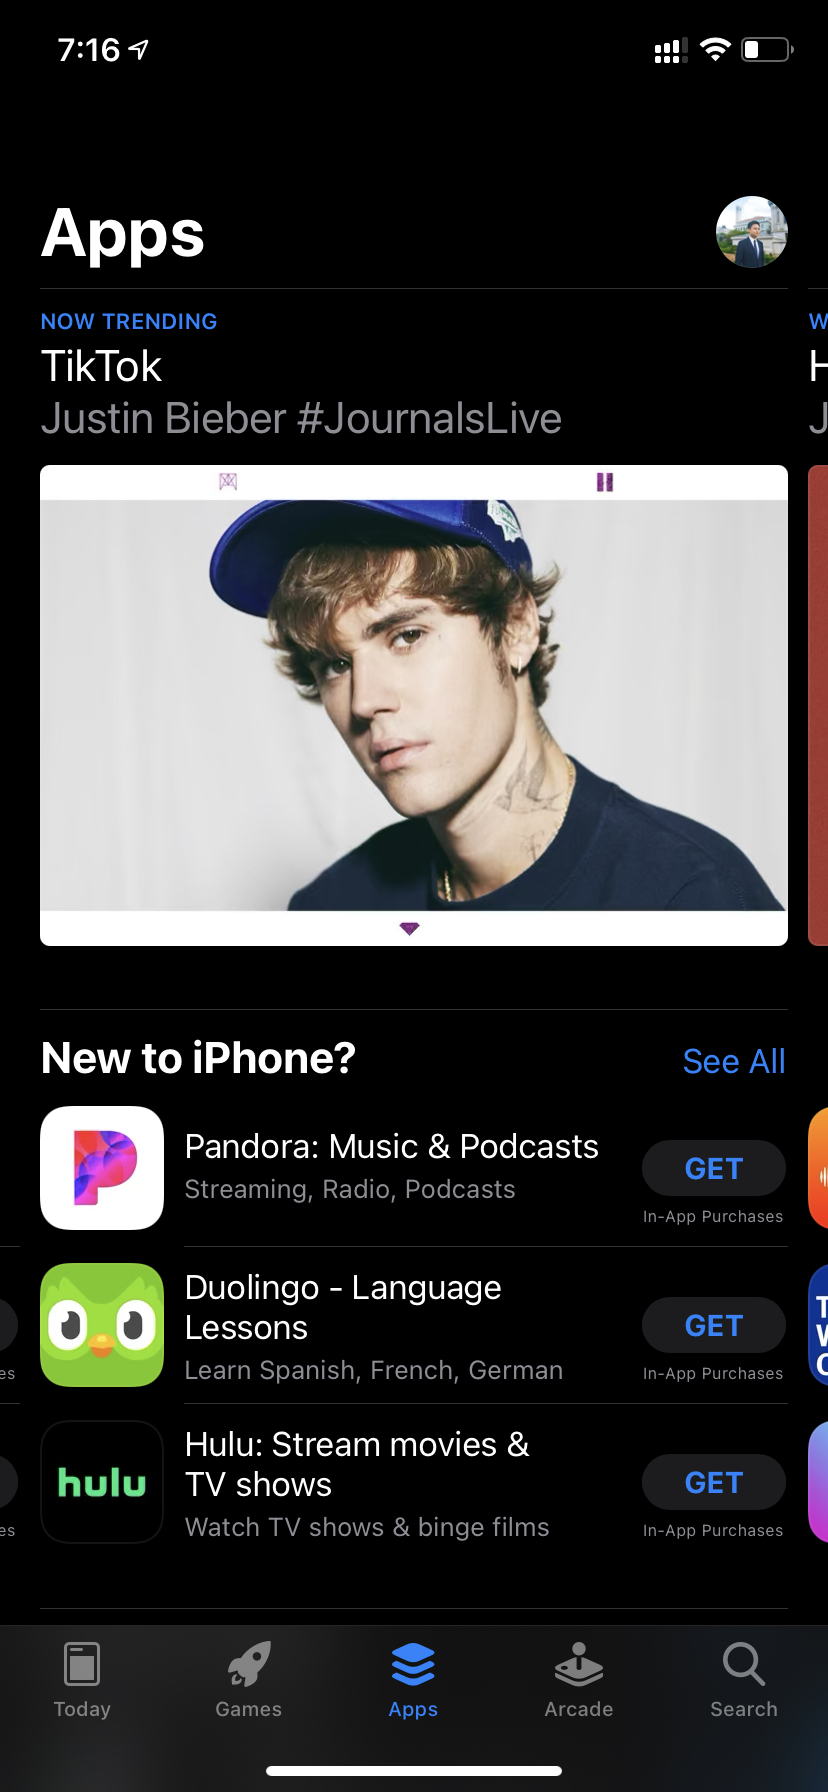
This entire page of the App Store is implemented with a single collection view. Although we won’t go into that level just yet, it’s nice to see what a simple collection view is capable of.
Instantiating a UICollectionView
The most basic collection view comprises a layout object and some cells, and the most basic type of layout you can get is flow layout. It is shipped with the concrete UICollectionViewFlowLayout class and is available in UIKit.
let layout = UICollectionViewFlowLayout()
The flow layout places cells on a linear path and fits as many cells along that line as it can. When the layout object runs out of room on the current line, it creates a new line and continues the layout process there.

The flow layout defines several attributes that you can use to customize your layout, such as
layout.minimumLineSpacing = 40
layout.minimumInteritemSpacing = 5
To use a layout in a collection view, it has to be passed in during initialization
/* ViewDidLoad */
let layout = UICollectionViewFlowLayout()
let collectionView = UICollectionView(frame: view.bounds, collectionViewLayout: layout)
view.addSubview(collectionView)
This initialize a flow-layout collection view with the same size as the root view of the current view controller.
Designing Collection View Cell
In addition to a collection view layout, we will also need the cells to fill that layout. A collection view cell must be a subclass of the built-in UICollectionViewCell class. It can be defined outside of the view controller as a separate class or inside the view controller as nested types. Typically, each UICollectionViewCell subclass will have a reuse identifier and it must register with the collection view that is going to use it. This video will walk you through the details of creating a collection view cell class.
Passing Data to the Collection View
Now that we have our cells ready to go, we can start adding them to the collection view. The pattern we are going to use is called delegation.
Delegation is an OOP design pattern that enables an object to “delegate” a part of its functionality to another object. In our case, because we want the collection view to stay as a view, we will have it “ask” the view controller for its data. This establishes our view controller as the single source of truth for all the views, and is an important piece of the software design model called MVC (we will discuss this later).
To make our view controller “suitable” for performing the tasks as a collection view data source, we will first have it conforms to the UICollectionViewDataSource protocol. The protocol then requires our view controller to implement two methods
func collectionView(_ collectionView: UICollectionView, numberOfItemsInSection section: Int) -> Int

func collectionView(_ collectionView: UICollectionView, cellForItemAt indexPath: IndexPath) -> UICollectionViewCell
The first method ask how many cells are in each section, and the second one ask for the specific cell instance at the index path. By default your collection view will only have one section, but you can override that by implementing the optional requirement numberOfSections(in collectionView: UICollectionView) -> Int. In this video, we will complete the image cell collection view from the last video, and populate our collection view with SF Symbols.
Container View Controllers
Container view controllers are a special type of view controllers whose main job is to manage other view controllers. They are used to combine content from multiple VCs into a single user interface. It is most commonly used in navigation control such as stacks (UINavigationController), pages (UIPageViewController), and tabs (UITabBarController). Though you can implement custom container view controller to achieve a wide range of functionality, we will only be focusing on the built-in ones today.
Navigation Controller
By now you’ve probably seen the present(_:animated:completion:) and dismiss(animated:completion) methods used to modally present and dismiss a view controller. An UINavigationController is a generalization of these two operations. A navigation controller manages one or more child view controllers using an ordered array known as the navigation stack.
Whenever we want to present a view controller, we push the view controller to the top of the stack. When we want to dismiss a view controller, we pop it from the stack. Only the view controller on the top of the navigation stack is visible to the user.
In addition, a navigation controller manages a navigation bar, which displays a back button for dismissing the topmost view controller and a title for the current view controller.

Each view controller has a special property called navigationController. The property has type UINavigationController?. If the view controller is currently in the stack managed by a navigation controller, this property will point to the navigation controller.
Typically, you declare a navigation controller with its root view controller
let vc = ViewController()
let nav = UINavigationController(rootViewController)
You can push a view controller to the navigation stack by calling pushViewController(viewController:animated:) on the navigation controller. Similarly, you can pop the topmost view controller by calling popViewController(animated:).
TabBarController
The tab bar controller displays tabs at the bottom of the window. Each tab corresponds to a child view controller, and the selection determines which view controller to display.
The following code initialize a tab bar controller with two tabs
let tabBarController = UITabBarController()
let vc1 = HomeVC()
let vc2 = SettingVC()
let vc3 = UINavigationController(rootViewController: vc2)

tabBarController.viewControllers = [vc1, vc2]
Notice that for the second tab we create a navigation controller as a child of the tab bar controller. It is an example where we can use container view controllers to create more complex user interface.
Model-View-Controller (MVC)
MVC is a popular software architectural pattern for making an iOS App. It divides your code into three main categories: model, view, and controller.
A view object is the visual layer of our app. It is what the user sees, and it is what the user interacts with. A view object should not be responsible for book-keeping the data, it should only know how to present the data.
A model is the opposite of views. It is the data representation of our App. It could be a user class, or a style struct.
Finally, the view controller is the interface between models and views. When a user initiates an action, the view delegate that action to the view controller. The view controller handles the action by performing a view update and/or modifying the models.
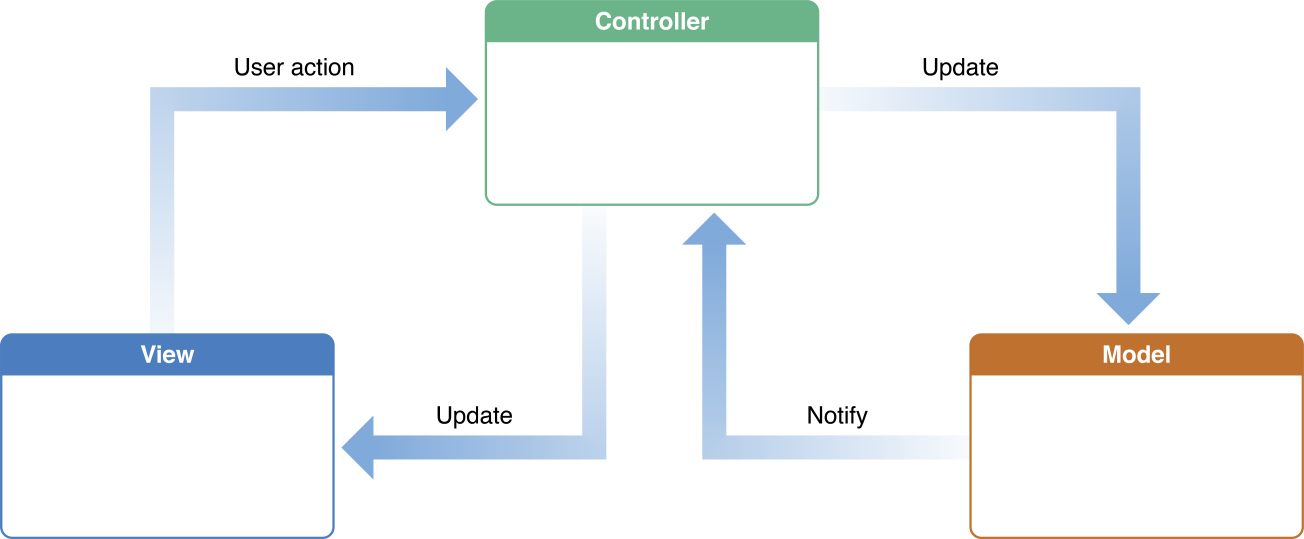
Sticking to this approach generally helps you write more scalable and readable code. But it doesn’t mean that you are in the clear. It’s much more important to understand the design principle such as the separation of concern. A good piece of code should be modular, consists of many independent black boxes. If you find yourself having to deal with a single gigantic chunk of code that does basically everything, you are probably doing something wrong.