Introduction to Swift and iOS Development
Michael Lin
Table of Contents
- The Swift Programming Language
- Introduction to iOS Development
The Swift Programming Language
Constants and Variables
In Swift, you can declare a constant with the let keyword and variables using var.
var foo = “Hello”   /* Variable */
let bar = “World”   /* Constant */
You cannot reassign the value of a constant once it’s declared.
You can specify the type of a variable or constant using :. This also allows you to declare a variable or constant without initializing it. However, it will not be usable until you give it a value (even nil).
var name: String
name = “Oski”
If you do not specify a type, Swift can infer it from the value it was initially assigned to. This is known as type inference.
Swift is a strongly-typed language. That means you can’t reassign the value of a variable or constant to a different type once it’s declared.
For naming, always stick to lowerCamelCase for constants and variables.
Collection Types
Swift provides three primary collection types, known as arrays, sets, and dictionaries, for storing collections of values. Arrays are ordered collections of values. Sets are unordered collections of unique values. Dictionaries are unordered collections of key-value associations.

Array
The type of a Swift array is written in full as Array<Element>, where Element is the type of values the array is allowed to store. You can also write the type of an array in shorthand form as [Element]. Therefore, an array can be declared
like this
var libraries: [String] = ["Moffitt", "Main Stack", "EAL"]
Retrieve or modify a value from the array by using a subscript.
var firstItem = libraries[0]
libraries[1] = "Music Library"
Append a new value by calling the append(_:) method
libraries.append("Engineering Library")
Alternatively, append an array of one or more compatible items with the addition assignment operator +=
libraries += ["Law Library", "Bancroft"]
Dictionary
The type of a Swift dictionary is written in full as Dictionary<Key, Value>, where Key is the type of value that can be used as a dictionary key, and Value is the type of value that the dictionary stores for those keys. You can also write the type of a dictionary in shorthand form as [Key: Value]. Therefore, a dictionary can be declared like this
var distance: [String: Double] = ["Moffitt": 0.9, "Main Stack": 1.0, "EAL": 1.1]
print("The dictionary contains \(distance.count) items.")
// Prints "The dictionary contains 3 items."
Similar to arrays, you can retrieve or modify a value from the dictionary using subscript.
distance["Main Stack"] = 1.3
distance["Moffitt"]
However, there is no append(_:) method in dictionary. To add a new value, simply use the subscript.
distance["Music Library"] = 1.5
Set
The type of a Swift set is written as Set
var libraries: Set<String> = ["Moffitt", "Main Stack", "EAL"]
You can insert an element by calling the set’s insert(_:) method. To check whether a set contains a particular item, use the contains(_:) method.
Control Flow
If Statement
In swift, a basic if statement looks like this
if condition {
    action
}
You can chain multiple if statement together using else if and else
if condition {
    statements
} else if {
    statements
} else {
    statements
}
You can combine multiple predicates using the logical operator ! || &&.
For single-expression if statements, you can usually simplify them with the
ternary operator
condition ? expression : expression
If the condition is true, the first expression will be executed and its return value would be the return value of the whole statement. A simple example can look like this
var feel: String = temp > 75 : "hot" : "ok"
For-In Loops
You use the for-in loop to iterate over a sequence, such as items in an array, ranges of numbers, or characters in a string.
let names: [String] = ["Anna", "Alex", "Brian", "Jack"]
for name in names {
    print("Hello, \(name)!")
}
You can also use in to iterate through a dictionary. That would give you
all of its key-value pairs.
let numberOfLegs: [String: Int] = ["spider": 8, "ant": 6, "cat": 4]
for (animalName, legCount) in numberOfLegs {
    print("\(animalName)s have \(legCount) legs")
}
While Loops
A while loop starts by evaluating a single condition. If the condition is true, a set of statements is repeated until the condition becomes false.
while condition {
    statements
}
Functions
Every function is a chunk of code that performs a specific task. It is defined using the keyword func followed by the name of the function. Optionally, you can define one or more parameters to be passed in as input. You can also specify the return type using ->. For example, a simple function declaration can look like this.
func answer(question: String) -> String { }
You would then call the function using its name and parameter, which will return a String.
var answer1: String = answer(question: "Question 1")
For each parameter, you can also specify its label, and it will be used when you are calling the function. This helps to create easier to read function calls like this.
func answer(for question: String) -> String { }

var answer1: String = answer(for: "Question 1")
By default, the argument labels are the same as the parameter names, and will be used when calling the function like in answer(question: "Question 1"). If you want no function label at all during the function call, write an underscore _ for that parameter.
func answer(_ question: String) -> String { }

var answer1: String = answer("Question 1")
Classes
If you are new to the OOP (Object-Oriented Programming) model, there are many ways of describing classes. But here is my favorite: Think of it as a blueprint for a house. You can create multiple instances of that house with the same blueprint, but the interior design which is the data is going to be different. Each house operates on its own, but they all share the same structure and behaviors.
In Swift, classes are declared using the class keyword. You define properties and methods to add functionality to your classes using the same syntax you use to define constants, variables, and functions.
class User {
    var username: String = ""
    var email: String = ""

    func printEmail() {
        print(email)
    }
}
A class can inherit methods, properties, and other characteristics from another class. When one class inherits from another, the inheriting class is known as a subclass, and the class it inherits from is known as its superclass.
class Admin: User {
    managedUsers: [User] = []
}
The value assigned with property declarations are the default values that will be assigned during class initialization. If no default value is specified, a custom initializer is needed.
class Admin: User {
    var managedUsers: [User]

    init(withManagedUsers users: [User]) {
        self.managedUsers = users
        super.init()
    }
}
Members of an class (either a property or a method) can be accessed using the dot notation ..
let user = User()
let user.email = "example@domain.com"
Structs
In Swift, structures and classes have very similar functionalities. Both of them can define properties and methods, conform to protocols, and be extended using an extension (we will talk about the last two in the next lesson).
struct Event {
    var eventName: String
    var startTime: Date
    var endTime: Date

    // Initializer
}
However, there are a few key differences too:
- Classes can inherit from another class and/or conform to one or more protocols whereas structures can only conform to protocols.
- Classes are reference types whereas structures are value types. Semantically, a value type is a type whose value is copied when it’s assigned to a variable or constant, or when it’s passed to a function. This is also the reason why, in the example above for dot notation, we were able to assign an user instance to a
letconstant and still be able to change its stored valueemail. Because when reassigningemail, the underlying reference inuserhasn’t changed. But ifUseris defined as a struct,let userwould then be representing a value instead of a reference. Then changing the email would be considered mutating that value, which is not allowed for a constant.
Optionals
Optional is a special type in Swift. It is used with another type and adds nil to the possible values of that type. In short, it handles the absence of a value. For example, an optional String means there’s either a String, or there’s no value at all. A regular, non-optional type cannot be nil.
var name: String? = nil
name = "🐻"
The process to retrieve the value from an optional is called unwrapping. In general, there are many ways of unwrapping an optional, but we will focus on three of the most common ones today.
Force Unwrapping
Force unwrapping is the most straightforward way of unwrapping an optional. It is done by adding ! to the end of a variable.
var name: String? = nil
name = "🐻"
var nameNonOptional: String = name!
However, force unwrapping will crash your code if the optional is nil. So in practice, you should force unwrap only when you’re sure it’s safe.
As a side note, it is possible to define optional values without having to unwrap them every time in order to use them.
let name: String! = nil
name = "🐻"
This is called implicitly unwrapped optional. The optional values defined using this method behave as if they were already unwrapped. But if you try to use them when they are nil, your code will crash. This is commonly used for variables that start as nil, but will always have a value before you need to use it.
Optional Binding
You use optional binding to find out whether an optional contains a value, and if so, to make that value available as a temporary constant or variable.
var name: String? = nil
name = "🐻"
if let nameNonOptional = name {
    print("The name is \(nameNonOptional)")
    // The name is 🐻
} else {
    print("Name not available")
}
Multiple values can be bound in a single if-let statement. Each statement is separated using a comma. In the following example, failable initializer Int(_:) returns an optional integer Int?.
var startStr = "2", endStr = "10"
if let startDay = Int(startStr), let endDay = Int(endStr) {
    print("Span: \(endDay - startDay) days")
}
You can also use regular boolean expression in an if-let. For example, if we want to print only when the day difference is more than 0:
if let startDay = Int(startStr), let endDay = Int(endStr),
    endDay > startDay {
    print("Span: \(endDay - startDay) days")
}
Early Exit
A guard statement behaves very similarly to an if statement. It uses a boolean expression to determine whether to continue executing code in a function or transfer control to exit the code. In another word, guard checks for requirements in a specific line of code.
let calendar = NSCalendar.current
// Friday?
guard calendar.component(.weekday, from: Date()) == 6 else {
    return
}
print("Smash Bros 🎮 🎉")
However, the reason why guard is introduced here is that it’s most commonly used with let to create a conditional binding that’s available in the same block scope, and it works pretty much the same as the if-let statement.
var startStr = "2", endStr = "10"
guard let startDay = Int(startStr), let endDay = Int(endStr),
    endDay > startDay else {
    return
}
print("Span: \(endDay - startDay) days")
Introduction to iOS Development
Create Your First Xcode Project
While I’ve mentioned earlier that Swift Playground is good for trying out code and ideas, an Xcode project is where the real iOS development begins. Although you won’t need to create your own project for MP1, you should always know how to create one. This short video takes you step by step through the process.
Xcode Interface
Once you’ve created the project, take a moment to familiarize yourself with the interface. There’s a lot of information on screen, so this video is going to break it down to help you understand.
Basic File Structure and Management
As we are getting used to the interface, let’s take a look at the basic file structure that comes with the default app template and how Xcode manages them.
View Controllers and Views
The first main concept we are going to introduce here is the view controller. View controllers are the foundation of your app. Every app has at least one view controller, and most apps have several. It manages components of your app’s interface called views as well as the interactions between that interface and the underlying data.
View controllers are like screens. For example, when switching between tabs, you are switching between different view controllers. So in essence, They are the building blocks of your app’s navigation.
You create your custom view controller through subclassing the build-in UIViewController class from the UIKit framework. In the following example, we declare a view controller called HomeViewController and set its backgroundColor to red.
import UIKit

class HomeViewController: UIViewController {

    override func viewDidLoad() {
        super.viewDidLoad()
        view.backgroundColor = UIColor.systemRed
    }
}
Custom view controllers are usually named XXXViewController or XXXVC for short. Just like any other type in Swift, you should always use UpperCamelCase when naming view controllers. There should be only one view controller in each file, and the name of the file should be View Controller's Name.swift.
View Management
The most important role of a view controller is to manage a hierarchy of views. Every view controller has a single root view that encloses all of the view controller’s content. To that root view, you add the subviews you need to display your content. The parent view of a subview is also called the superview.

You access a view controller’s root view through the self.view property (or just view where self pointer can be omitted). All view components in UIKit are subclasses of the UIView class, which defines the behaviors that are common to all views. You can add subview to any view using the addSubview(_:) method.
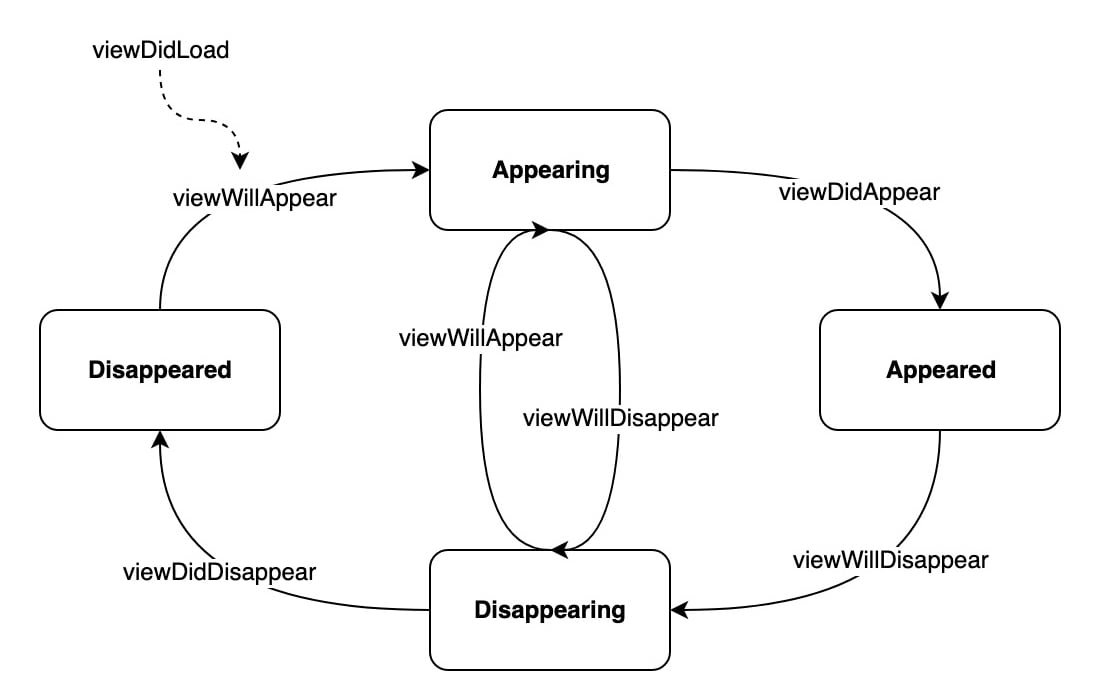
Life Cycle
A view controller comes with a set of methods that manage its view hierarchy. iOS automatically calls these methods at appropriate times when a view controller transitions between states. These transitions are known as the Life Cycle Events. When you create a view controller subclass, it inherits the methods defined in UIViewController and lets you add your own custom behavior for each method.
One method you’ve seen so far is viewDidLoad(). It’s called after th e views in a view controller are created and loaded into memory. Since this usually only happens once in the view controller’s entire lifecycle, viewDidLoad() is commonly used for styling, adding subviews, and creating and activating constraints.
Other life cycle methods such as viewDidAppear(), viewWillAppear(), viewWillDisappear() and etc., can be called multiple times depending on how the view controller behaves.
You define the custom behaviors for a lifecycle event by overriding the default implementation of the corresponding lifecycle method.
override func viewDidLoad() {
    super.viewDidLoad()
    view.backgroundColor = UIColor.systemRed
}
Note: Although superclass implementation in super.viewDidLoad() doesn’t do anything, it’s a good habit to call super for all functions you override that don’t have a return value.
First Custom View
As you’ve learned in the previous section, the build-in viewDidLoad() is useful for many one-time setups including styling and adding subviews. However, although it is possible to create, style, and add subview entirely using viewDidLoad(), it is not recommended for many reasons:
- As your UI grows more complex,
viewDidLoad()tends to get very bloated, which is bad for readability. - If you want to keep a reference of the views created, you’d have to declare an optional instance variable which initializes to
nil, then fill in the value inviewDidLoad().
Therefore, it is common to defer some of that setup to the initialization phase before viewDidLoad() kicks in. Conveniently, Swift allows us to initialize a variable along with the declaration using a closure, which is kinda like the lambda expression in Python. Recall that in Python we can write tiny, “anonymous” functions like this
lambda x, y: x * y
and in Swift, the equivalent closure can look like this
{ x, y in
    return x * y
}
We will formally introduce closure in our next lesson, but for now let’s just stick to the notion that it’s just a portable function that can be called and passed around.
In this video, we will see how to use this pattern to create a UILabel and add it to the rootview.
Frames
In the last video we used something called frame to create our UILabel, and you probably already have a little idea what that’s for.
UILabel(frame: CGRect(x: 0, y: 88, width: UIScreen.main.bounds.width, height: 60))
In UIKit, the position of a view is described by a point-based coordinate system. It starts from the top left of the referencing view (0, 0) and ends at the bottom right. A frame is a rectangle that defines the size and position of the view in its superview’s coordinate system. In the example above, we used UIScreen.main.bounds because the root view has the same frame as the screen. In fact, we can use view.bounds.width and the effect would’ve been the same. But we will then have to set our frame in viewDidLoad because self.view (or in particular, self) isn’t available in the instance initialization phase.
welcomeLabel.frame = CGRect(x: 0, y: 88, width: view.bounds.width, height: 60)
Note: The difference between frame and bounds is detailed in -this article.

One thing to keep in mind is that for UILabel, changing the frame will not affect the physical size of the label, unless the frame causes it to overflow. This is because the frame only specifies a rectangle to which we put our view in. The size of the label itself is controlled by its font size, which was set through UILabel.font and was 27 points in our last example. However, if we set the background color to something we will be able to see, resizing the frame does change the way it looks.
AutoLayout and Constraints
Although using frame seems clean and definitive, it does come with quite a few drawbacks:
Since different iOS devices may have different screen sizes (iPhone 12 Pro Max: 428×926 points; iPhone XR: 414×896 points), aligning the views can be tedious and oftentimes tricky. Most of the time it often involves computing all the values dynamically. For example, if we want our 200×70 label to be at the center of every screen, we would have to do this
let width = 200
let height = 70
let x = (UIScreen.main.bounds.width - width) / 2
let y = (UIScreen.main.bounds.height - height) / 2
label.frame = CGRect(x: x, y: y, width: width, height: height)
It only gets worse when you add multiple layers of subviews or trying to accommodate smaller screens. Therefore, in practice, we rarely use frame to set the position and size of a view, instead, we use another layout method called Auto Layout.
Auto Layout defines your user interface using a series of constraints. A constraint typically represents a relationship between two views such as spacing or alignment. iOS will then dynamically calculate the location and size of each view to satisfy these constraints. This creates layout that’s responsive to the device’s size and orientation changes.
Anatomy of a Constraint
In Auto Layout, the anchors define a feature that can be constrained. In general, this includes the four edge anchors (leading, trailing, top, and bottom), as well as the height, width, and vertical and horizontal centers anchors.

Each view manages its own anchors, and they are accessible as the view’s property. For instance, view.leadingAnchor would give you the leading anchor of view. Try typing out view.anchor inside any viewDidLoad() method. You should see a list of all available anchors showing up. We will be using these anchors to define our constraints.
Essentially, a constraint is a linear equation of anchors. For example, the following layout relation

can be expressed using the pseudocode equation
red.leadingAnchor = blue.trailingAnchor + 8.0
Recall that in iOS, the origin is at the top left corner of the screen. So this + here means to the right by 8 points. If it is -, it would mean to the left. Whether to use the x or y axis is determined by the anchor you use.
red.topAnchor = blue.bottomAnchor + 8.0
So the above constraint means the redView’s top anchor would be 8 points towards the bottom away from the blueView’s bottom anchor.
In Swift, constraints are typically created by calling the constraint(...) method on the anchor that’s going to be the left side of the equation. Suppose the two views are called redView and blueView, then the constraint can be defined like this
let constraint = redView.leadingAnchor.constraint(equalTo: blueView.trailingAnchor, constant: 8)
After that, you will have to activate the constraint
constraint.isActive = true
Or, if you don’t need to keep a reference to that constraint (meaning you don’t need to change it in the future), you can just write everything in a single line.
redView.leadingAnchor.constraint(equalTo: blueView.trailingAnchor, constant: 8).isActive = true
Programmatic constraints can look very daunting at first. But don’t worry! We will go over that in greater details during the next Hackshop, and it will become more efficient and less error-prone than storyboard constraints once you get used to them.
Provide Enough Information to Auto Layout
OK. I know that’s a bad title. But hey, the idea is clear: You need to give enough layout information (i.e. constraints) to auto layout because otherwise it gets confused. For instance, in our last example, we only specified the relative position between redView and blueView, as shown in this pseudocode equation
red.leadingAnchor = blue.trailingAnchor + 8.0
Without more information on the redView and blueView, there’s no way for the Auto Layout to know where to put these views.
Therefore, constraints are more commonly created between a fixed anchor (anchors with known location), and variable anchor (a.k.a your view). In a view controller, the easiest-to-get fixed anchors are the ones in the root view (from self.view in case you forgot). The top, leading, bottom, trailing anchors of the root view are essentially the edges of the screen, which is always fixed.
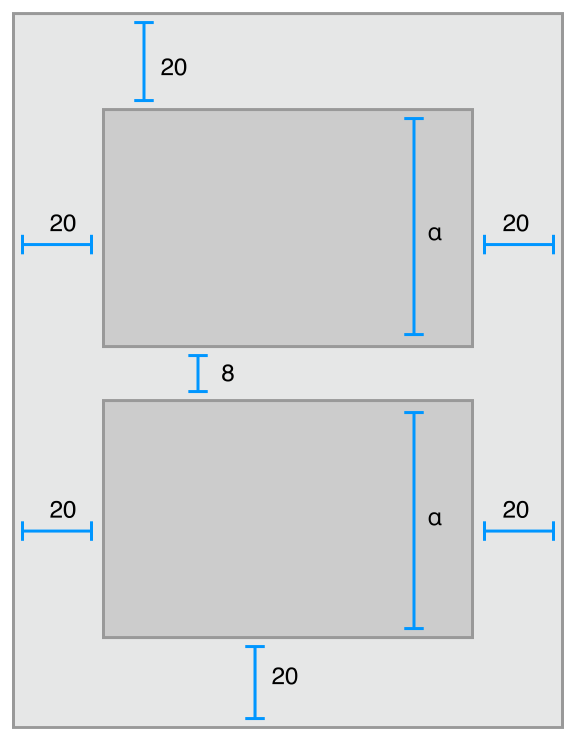
In this more complex example, the view with the light grey background is the root view. The layout of the two views in dark grey is defined using a total of 8 contraints.
Prevent Frame to be Translated into Constraint
By default, if you create a view programmatically, it is using the frame-based layout, even when no frame is passed into the initializer. This will result in the default frame ((x: 0, y: 0, width: 0, height: 0)) being translated into constraint and cause you view to vanish. To disable this behavior, set the translatesAutoresizingMaskIntoConstraints property to false.
let label = UILabel()
label.translatesAutoresizingMaskIntoConstraints = false
label.text = "AAPL GO 📈"  // Customization
view.addSubview(label)  // Add Subview

// Your constraints