
Building Apps
CalHacks 10.0 Workshop
Mobile Developers of Berkeley
Introduction
Mobile applications continue to be the primary way people interface with technology. When building applications at hackathons, there’s a lot to consider. One of the most important factors is time. You want to build something that’s useful, but you also want to build something that’s feasible. To do so, we will be using React Native to build cross-platform applications and Firebase on the backend, as they allow us to build applications quickly and efficiently.
In this workshop, we will explore React Native, React Navigation, and APIs to build a simple mobile application. We sill start with an overview of Typescript, React Native, React Navigation, and APIs. We will demonstrate how you can quickly prototype and view your app using Expo and Expo Go. You will have the opportunity to follow along using the provided starter code and instructions.
This is a beginner/intermediate level workshop intended to teach React/React Native for building mobile application, presented by the Mobile Developers of Berkeley VP of Development, Aniruth Narayanan.
If you would like to learn about integrating with Firebase, check out last year’s CalHacks workshop.
Guides for Transitioning to JavaScript
JavaScript is the language used in React Native. JavaScript Express is a general guide about JavaScript.
If you are familiar with Python or Java, you can use the following guides to help you transition to JavaScript.
These are listed (roughly) in order of depth.
From Python:
- JavaScript for Python Programmers by Thomas Ballinger
- JavaScript for Python Programmers by Mike Deplatis
- JS4Python
From Java:
- Transitioning from Java to JavaScript by Greg Bryne
- JavaScript for Java Developers, Angular University
Most projects use TypeScript, a superset of JavaScript that enforces typing (similar to Java and newer versions of Python, with differences between objects, numbers, strings, etc.). The demo app will be using TypeScript, but all typing information will be specified. It might seem more complicated at first to use TypeScript, but it will help you write more robust code.
Setup
You can use Windows, Mac, or Linux for this workshop.
Note that this setup should be done before the workshop. If you don’t have it, there will be live coding on the screen, and you’re free to do the setup steps and then code later.
Installation
Install VS Code as your code editor.
If on Windows: install git bash.
If on Mac: install xcode-command-line-tools using the command xcode-select --install.
Install Node, verify node –version and npm –version work (they should be printing out versions). Install yarn and confirm it works as well using yarn --version. Install expo-cli globally using npm i -g expo-cli (using sudo if on mac if need be).
Install the Expo Go app on your phone. This is how you can test code running on your local machine on the phone, by scanning the QR code that appears in the terminal when running expo start.
Use git to take the template we have of the starter code (linked below) and clone it locally. Enter the directory (using cd [folder name]), then run yarn install and expo install within the directory.
Verify your setup is correct by running expo start in the cloned repository. A QR code should pop up in the terminal, and when scanned in Expo Go, should load up the starter app code.
Optional: if on Mac, install XCode to get the simulator tools (so you can open up a simulated iPhone on the screen, instead of having to use your phone) - so the command expo start –-ios can be used. Note that you can use an Android emulator if on Windows or Linux if you’d like.
To summarize: you should have Node, Yarn, Expo-CLI, Expo Go, and VS Code installed. You should have cloned the starter code and run yarn install and expo install within the directory. You should be able to run expo start and scan the QR code in Expo Go to see the starter app on a phone or simulator.
Workshop Slides
The slides used in the presentation will are available here and below.
For a more in depth intro to building apps (including backend, security, etc.) check out our lessons.
Demo
The Mobile Developers of Berkeley have found a cool API that they would like to use: the Website Carbon API. Given some website, it will compute and cache the CO2 emissions of that website. However, there’s no easy interface to use this, so we will build one. We will build a simple app that allows users to enter a website and see the CO2 emissions of that website. The app will have a screen to see the history of all searches, with options to delete results and another screen to search for websites while maintaining internal state (history) between the screens.
History and Search Screens:
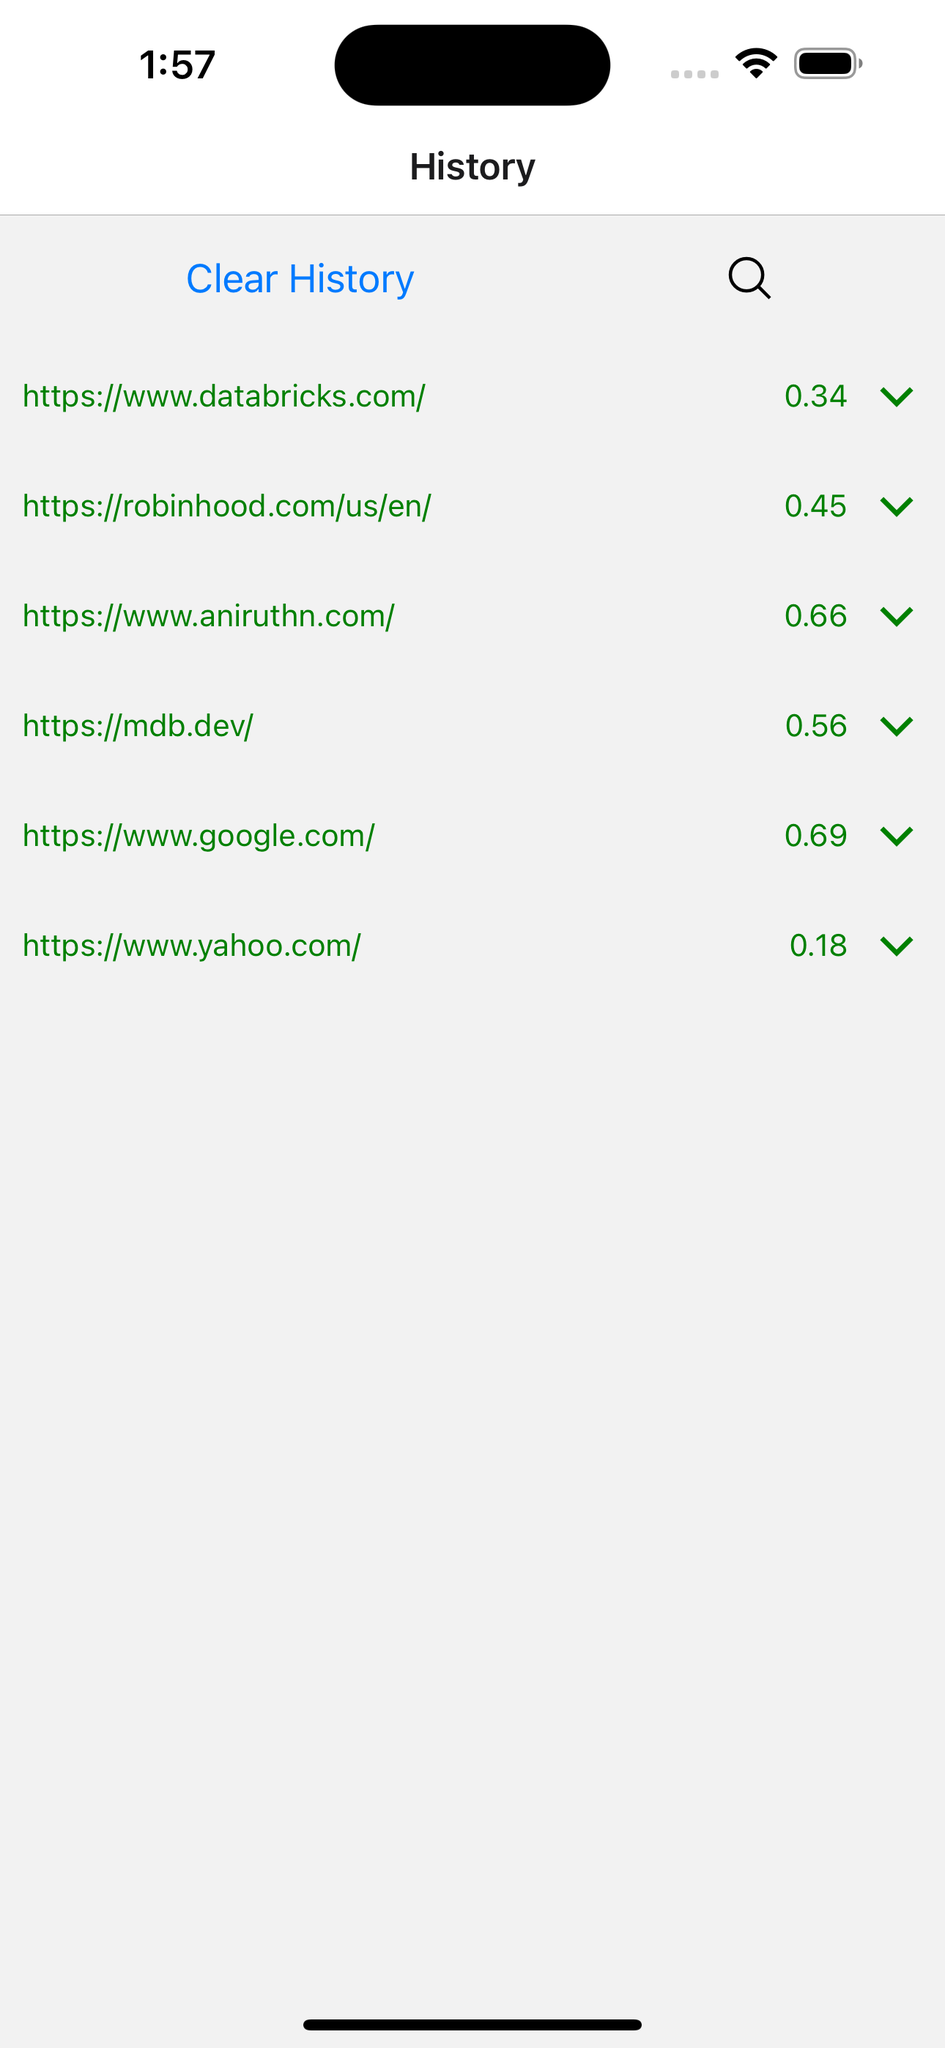
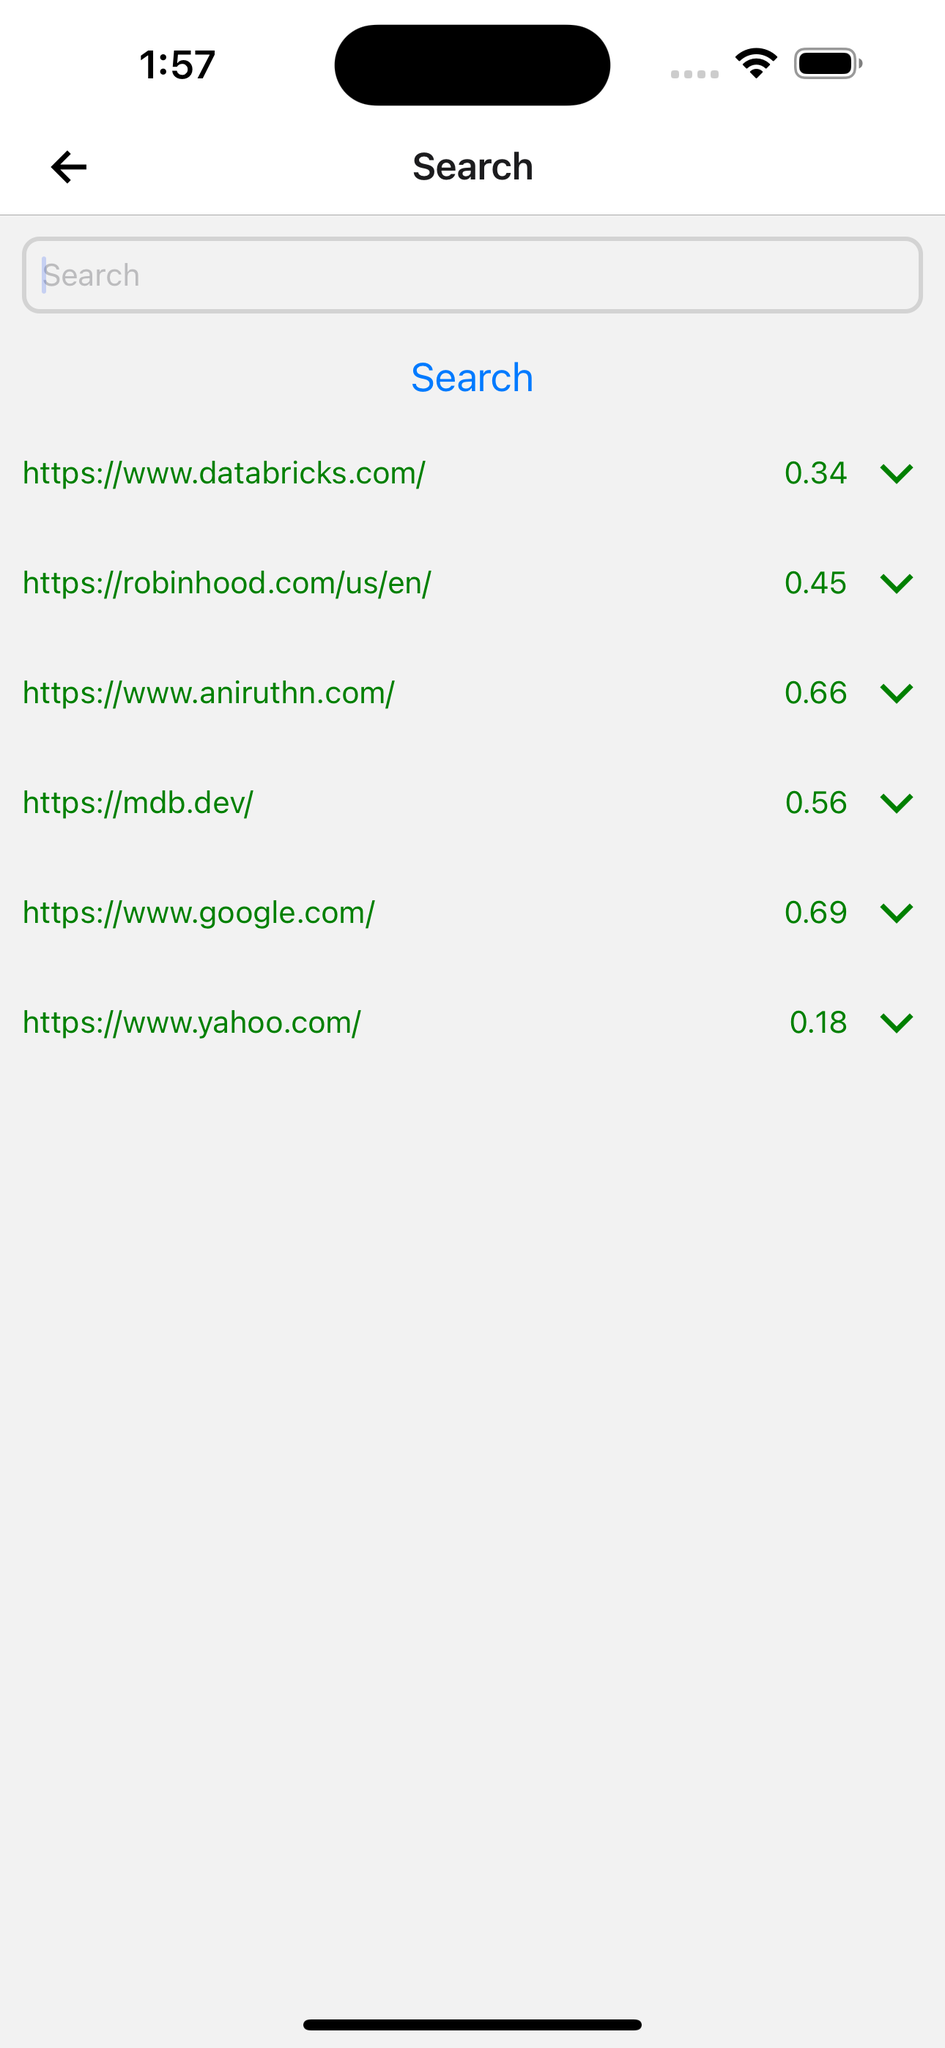
There are 5 files that we will be editing:
App.tsx- the main file that contains the navigation and the screensSearchScreen.tsx- the screen that allows users to search for websitesHistoryScreen.tsx- the screen that shows the history of searchesItem.tsx- the component that displays a single website’s dataCarbonDataType.tsx- the type of the data returned by the API, useful for our Typescript setup
Starter Code
note: the following instructions have calhacks9-starter; it’s the same steps, just with calhacks10-starter
To create your repository, go to the following link:
https://github.com/aniruthn/calhacks10-starter.git
You should see the following “Use this template” button:

After clicking on it, you should see the following:
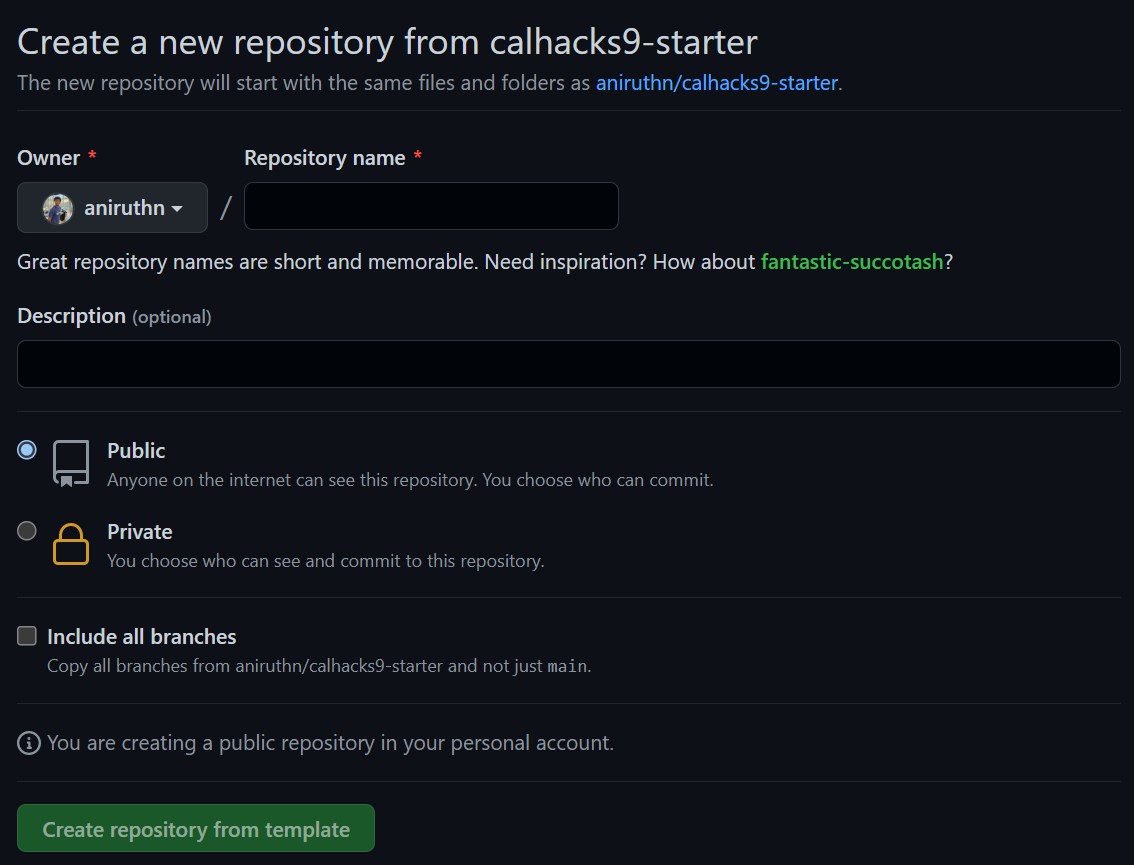
Click on the green “Use this template” button and follow the instructions to create your own repository. Name it whatever you’d like.
Once the templated repository is created, you should see the following:
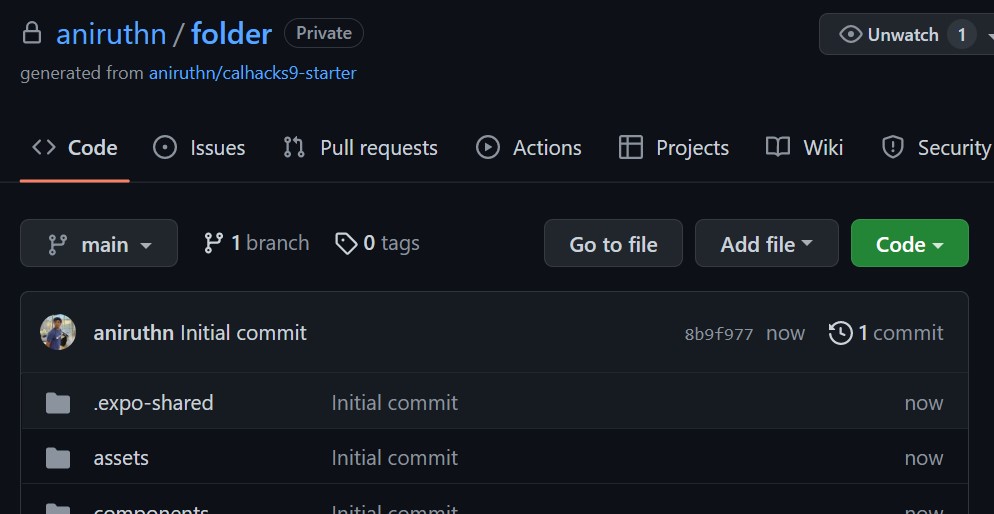
Then, clone that repository (not the template) to your local machine. You can do this by running the following command in your terminal:
git clone [your repository link]
To get the repository link, click on the green “Code” button and copy the link:

Reference Documentation
While you’re working, it’s helpful to keep an copy of the reference documentation open so you can see examples of components being used.
React Native Component Documentation (can use either):